In my first blog post on my home automation project, I mentioned that the ultimate goal was to run it all on a Galileo, but since .NET isn’t really supported yet, this wasn’t an option. Too the rescue comes Jer with his Mono port, allowing you to run .NET console apps on the Galileo. You can read the details on this on his blog post here: http://jeremiahmorrill.wordpress.com/2014/08/31/mono-on-windows-iot-galileo/
In my second blog post, I wrote a little console app that acts as a small webserver that allows Windows Store and Windows Phone apps to register themselves as a push target, and the console app can send push messages to these apps. In this blog post we’ll use Jer’s mono hack to get this running on the Galileo.
First, we need to “install” mono on Galileo. Jump to Jer’s blog post and grab the mono_iot.zip file at the bottom of his blog post. Next unzip this file to the Galileo in a root folder like \mono\. You can access the Galileo in a network path by adding \c$\ to the network path. Ie. unzip into: \\mygalileo\c$\mono\ (if your device name is ‘mygalileo’ or replace it with the name or IP number). If you haven’t done this before, you’ll be prompted for username/password. Enter “mygalileo\Administrator” and your admin password. That’s really all that’s required for ‘installing’ mono.
Now to run a .NET app, all you have to do is call [path-to-mono.exe] [path-to-my-app.exe] to launch the app with the mono runtime. Almost any .NET console app will work. Ie:
c:\mono\bin\mono.exe c:\sampleapp\ConsoleApp1.exe
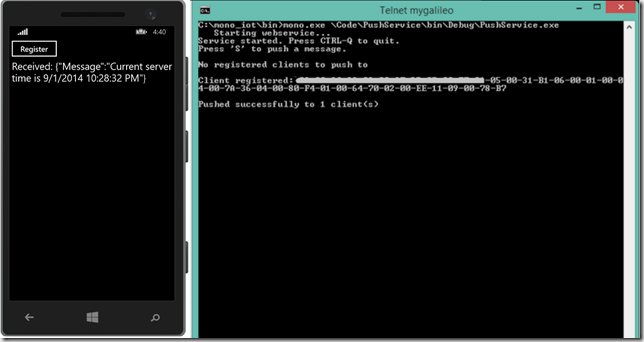
Next, we’ll run the push service app from my previous blog post. Compile the PushService app (yes you can use Visual Studio – no need for the Mono compiler) and copy it to the Galileo. Then open a Telnet terminal to Galileo, and start the service:
c:\mono\bin\mono.exe c:\PushService\PushService.exe
Next, update the client store/phone app to point to the IP of your galileo device, and make sure it’s on the same network. When running the app, you should now be able to register with the push service.

CTRL-Q to quit doesn’t seem to work. I’m guessing the CTRL key isn’t sent via telnet. You can just hit CTRL-C to quit the app.
Also if you press “S” to push a message, you’ll notice that the app fails. This is because the push notification hits an SSL secured server, and Mono doesn’t come with any SSL roots certificates installed. An in-depth article is describing this here: http://www.mono-project.com/docs/faq/security/ and here: http://www.mono-project.com/archived/usingtrustedrootsrespectfully/ . Note though that the current Mono build you installed doesn’t seem to work for the certificate imports, so most of the solutions might not work for you. As a TEMPORARY alternative, we can get rid of the SSL certificate validation. Note: This is quite dangerous and should NOT be used in production. But for testing this is fine (if you think this is not a big deal, think again – iOS and MacOS had this issue recently and it was a MAJOR security problem). To disable validation, we basically just take over validation and return ‘true’ to say the certificate is fine regardless of it’s contents. You could also enhance this yourself by performing your own validation. To do this, all we need to add is the following line of code when the console app starts up:
ServicePointManager.ServerCertificateValidationCallback = delegate { return true; };
Now redeploy the app, and you can now get your Galileo to perform push messages straight to your phone or tablet! How cool is that???

This is all the starting pieces you need to build a small simple .NET based webserver for controlling your Galileo. At the same time it’s all you need for getting your Galileo to notify you of certain events occurring. Bottom line: It’s the first big step into a .NET based home automation controller. The next big step is to create the building blocks for a trigger –> event system, so we can start automating and monitoring our home with the power of .NET and Windows on Devices.