Linking to Your Windows Store App

I just got my first app published in the Windows Store, and I wanted to create a direct link from the game homepage to the entry in the Windows Store. For this you can use the ms-windows-store protocol on your links, as described on msdn. To set it up, the first thing you’ll need to do is open up your project in Visual Studio, then open the Package.appxmanifest file. If your app has been associated with the Windows Store (this will happen the first time you create the publication package), the “Package family name” field should be populated under the “Packaging” tab:

image

Copy this package family name, and prefix it to “ms-windows-store:PDP?PFN=”

Example: ms-windows-store:PDP?PFN=57398MortenNielsen.Bao_9qs9wzj9xadrg

This should open my game up directly in the Windows Store App if you are on Windows 8 (and while you’re at it, please download it and throw it a good review – it’s free and goes for a good cause :-).

You can also link directly to the review page by adding REVIEW to the prefix.

Example: ms-windows-store:REVIEW?PFN=57398MortenNielsen.Bao_9qs9wzj9xadrg (and please leave a good review while you’re at it :-)

It’s also possible to link to a website that shows the same overview. This is nice if the user doesn’t have Windows 8 and you just want to tease them, or you prefer showing a webpage first in any case. However you won’t be able to get this link until the app has been published. Sign in to the App Store Developer Portal, click the “Details” link for your app listing, and scroll down. You’ll find a link under “Link to [APPNAME]",

image

Here’s the link as an example what the Windows Store Webpage looks like: http://apps.microsoft.com/webpdp/en-US/app/bao/dbe2f3a7-2deb-40d5-9a69-2995f14d6706
(and if you didn’t download the app yet, here’s your second chance :-)

You can also integrate your application into the IE10 Metro browser. Here’s what that looks like prior to installing the app:

image

And after install:

image

This would be a great experience if you offer both a website and a app version as well, allowing the user to quickly switch from one to the other. IE10 passes the url to your app so you can jump to a specific feature in your app, or you can add a third metatag with the arguments. You can read more about this feature here. Again you can try this experience at http://bao.win-rt.com (and this’ll be your 3rd chance to download my app :-).

Here’s the metatag you’ll need to add to the header:

<meta name="msApplication-ID" content="App"/>
<meta name="msApplication-PackageFamilyName" content="57398MortenNielsen.Bao_9qs9wzj9xadrg"/>.

The PackageFamilyName is the same, but the Application-ID you get by opening up the package.appmanifest in a text editor. Under the <Application> tag you’ll find the ID:

    <Applications>
        <Application Id="App" Executable="$target…

References:

The Windows Store Submission Process

I recently got access to the Windows Store, and submitted my first app, “The game of Bao”, a simple and fun board game I learned when we visited Malawi, Africa during our honeymoon (any money the game makes will be donated back to an organization working on improving the lives of the kids that taught us this game, so please be kind and play it a lot and give some great reviews :-).

I recorded the steps that I have had to go through so you can see what you need to have ready if you need to submit an app yourself.

*Note: Currently access to the Windows Store is limited to either companies and people who goes through an “App Excellence Lab”. Once your app gets the “seal of approval” from a Microsoft Engineer, you’ll get an invite code so you can create an account for the Windows Store.

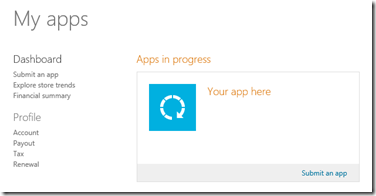
When you sign into the windows store, the first thing you’re greeted with is the dashboard, where you can submit an app.
image

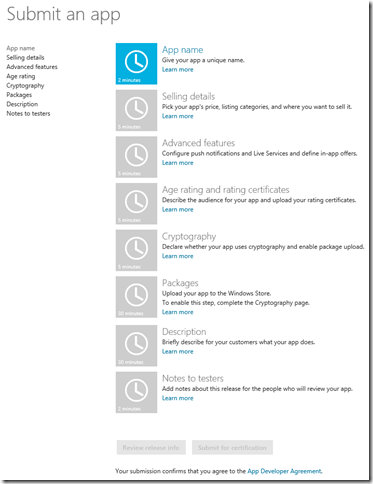
Clicking “Submit an app” brings you to a list of the steps you have to go through. You work your way through them from top to bottom (you can always go back and change stuff as long as you haven’t submitted yet):
image

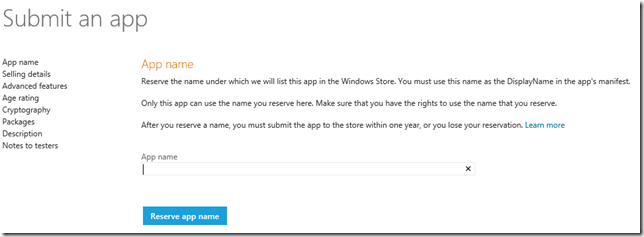
First step is to give you application a name. This is a unique name, so if someone else already published an app with that name, you’ll have to come up with a different name. Also note the mention that your app’s manifest must have the exact same DisplayName set. You can also reserve your app name this way, and later finish the app submission process when your app is ready.image
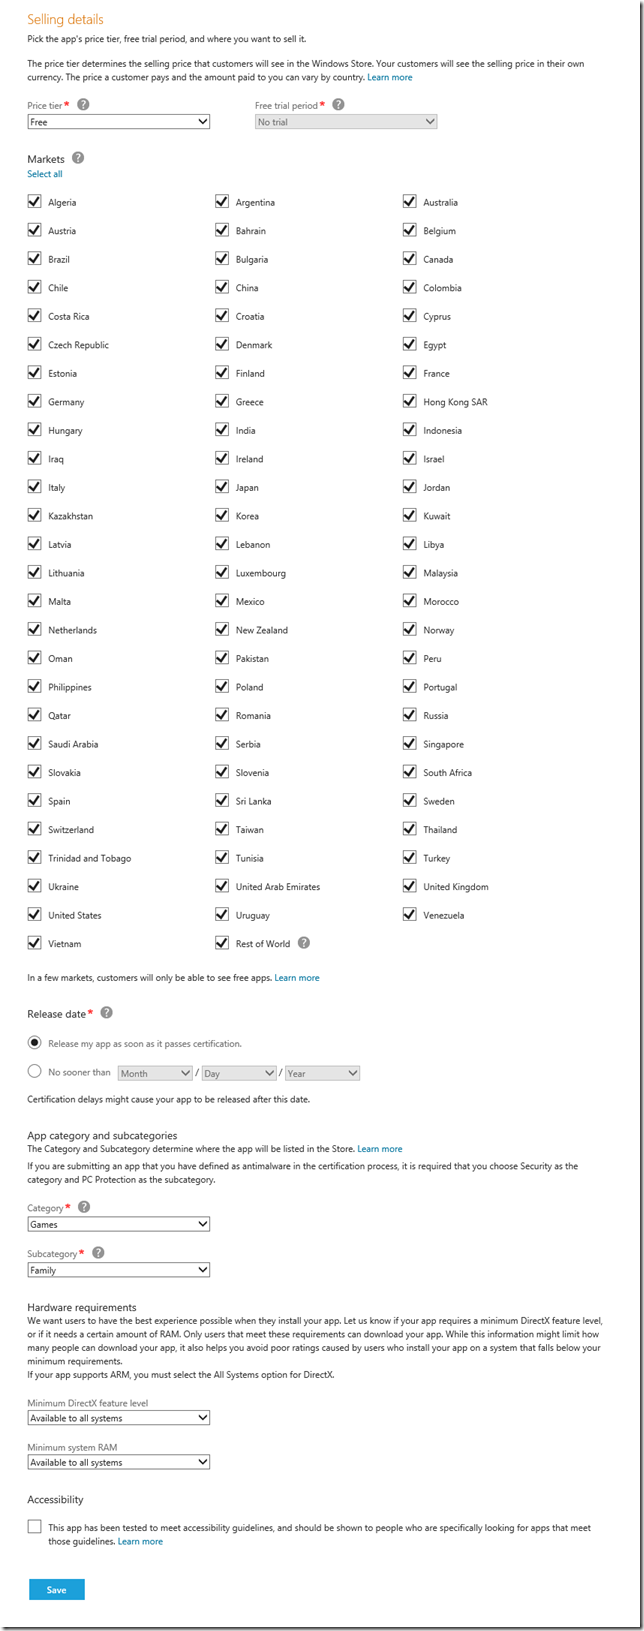
The next step is the selling details. There’s quite a lot to fill out here, but still pretty straightforward:
image

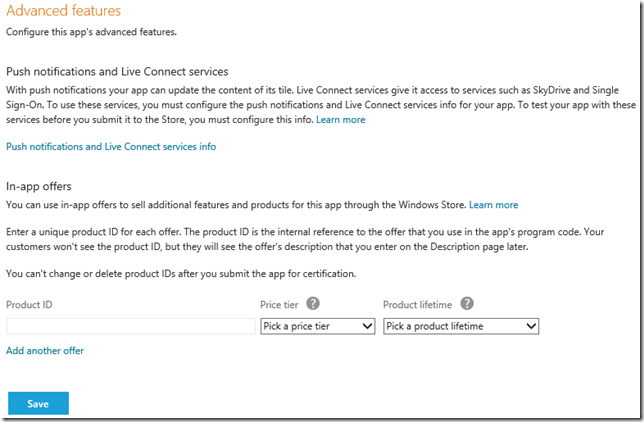
The next page allows you to configure in-app purchase (you can add as many as you want, ranging from $1.49 up to $999.99):
image

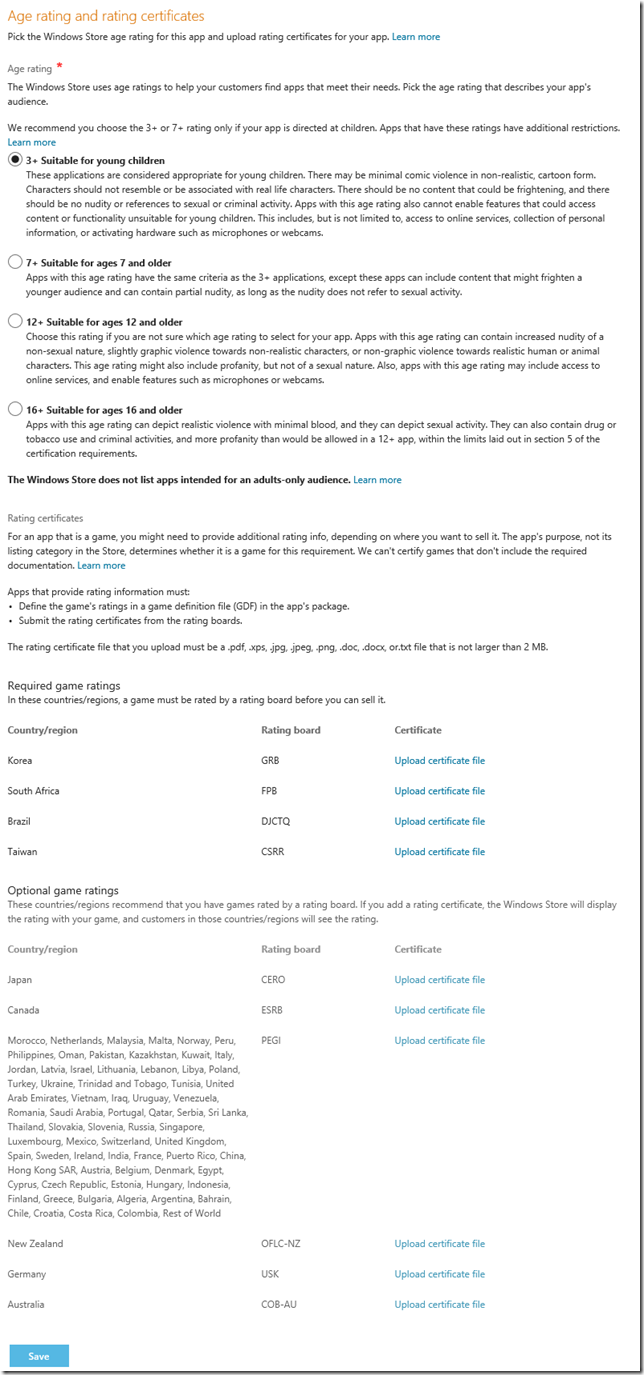
The next step is the age rating. Make sure you read the “small” print. If your app has access to the internet, chances are you can’t go with the lowest rating, no matter how PG your app is. Also note that for some countries a rating certificate is required to be able to publish there (I have no clue how to get these though):
image

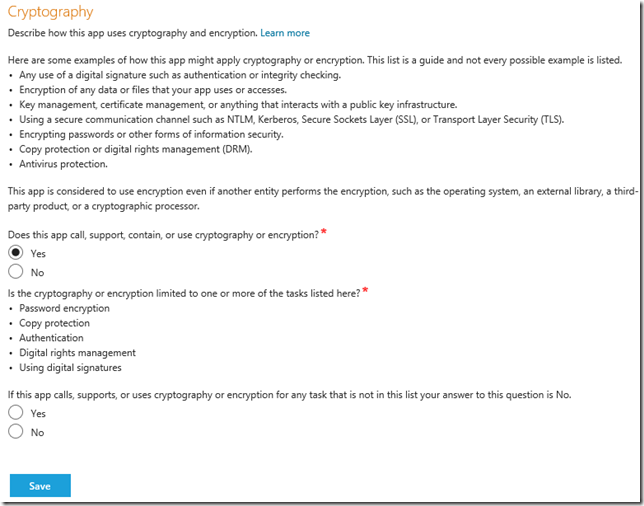
Next step is declaring whether your app uses any form of cryptography (there’s a lot of export restrictions on that technology). You either say yes or no. If you pick yes, you’ll be asked a few more questions about this:
image

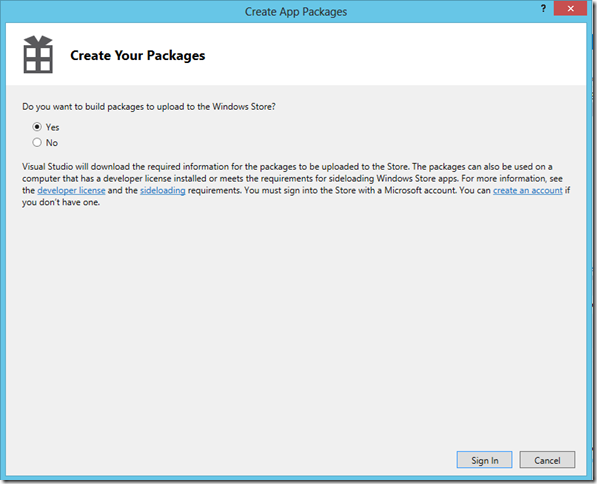
Next step is to upload your app package. In Visual Studio, select “Project –> Store –> Create App Packages…”
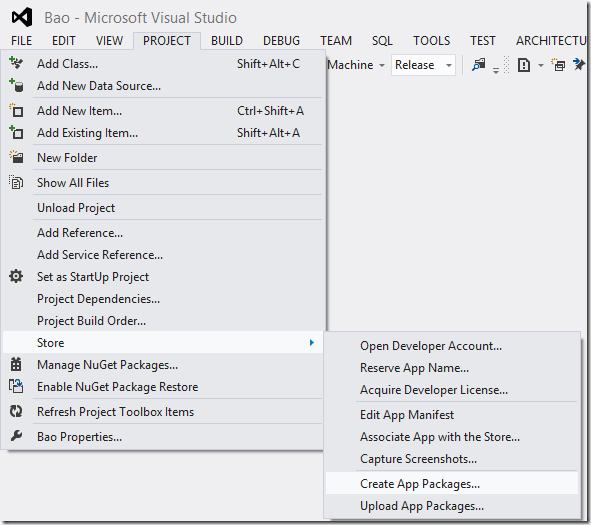
image

Pick for Windows Store.

image

You’ll then be asked to sign in. It’ll find the app name you reserved in the first step and then generate the .appxupload package that you’ll need in the next step:
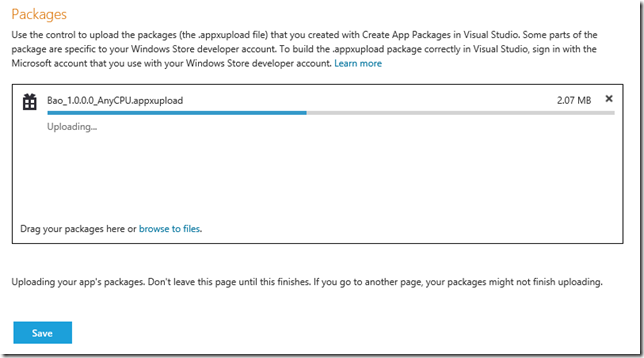
image

Next is the app description. You’ll need 1-8 screenshots (1366x768), Promotional Images (846x468,558x756,414x468,414x80) keywords, app features, Description, web-link to Privacy Policy (if you have internet-enabled your app), description of all in-app purchace options to name a few.
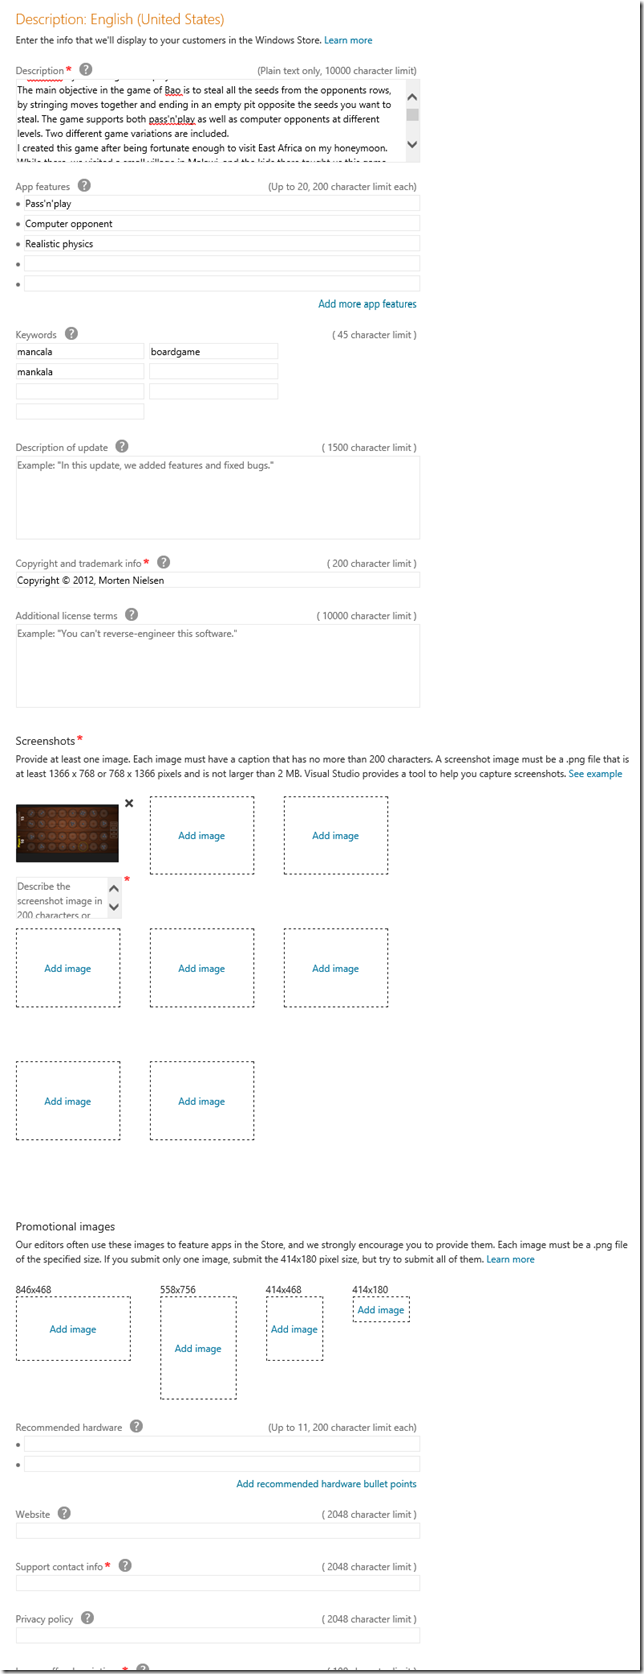
image

Last step is to optionally include some notes to the testers:
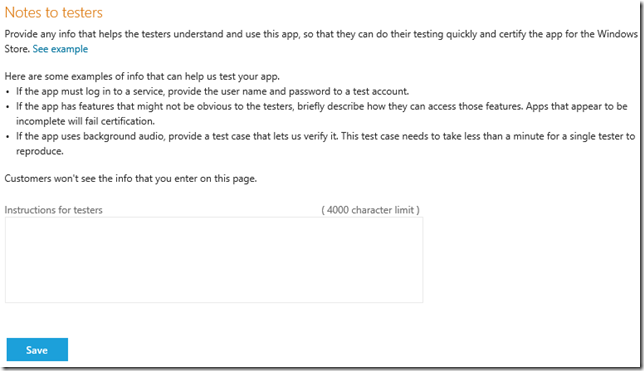
image

When you’re done, you should be back at the overview page with all check-marks:
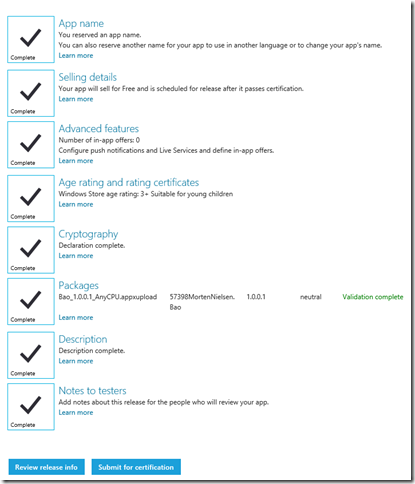
image

Either review your data, or hit “Submit for certification”. All you can do now is sit back and wait for the app to go through. There’s an estimate listed of how long each step usually takes.
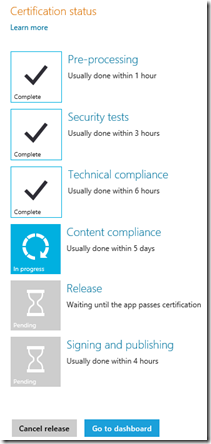
image

Running a Storyboard as a Task

Sometimes you have some code that needs to run after a storyboard has completed. In my case I'm working on a little board game, and after each move (which I animate using a Storyboard), I need to figure out the next move, and either start a new play-animation or pass the turn to the other player.

Therefore I run in a loop until the turn is over. You can detect when a storyboard has finished when the "Completed" event triggers, but that makes for some recursive spaghetti code. It's much easier if I could just "await" the storyboard using a task. So I created the little extension method below that makes this possible. All you have to do to start and wait for the storyboard to finish is:

    await myStoryboard.BeginAsync();

Below is the little extension method (which also serves as a general example on how you turn an event-based class into an awaitable Task using the TaskCompletionSource):

using System;
using System.Threading.Tasks;
using Windows.UI.Xaml.Media.Animation;

namespace SharpGIS
{
    public static class StoryboardExtensions
    {
        public static Task BeginAsync(this Storyboard storyboard)
        {
            System.Threading.Tasks.TaskCompletionSource<bool> tcs = new TaskCompletionSource<bool>();
            if (storyboard == null)
                tcs.SetException(new ArgumentNullException());
            else
            {
                EventHandler<object> onComplete = null;
                onComplete = (s, e) => {
                    storyboard.Completed -= onComplete; 
                    tcs.SetResult(true); 
                };
                storyboard.Completed += onComplete;
                storyboard.Begin();
            }
            return tcs.Task;
        }
    }
}

Note: This code is written for WinRT. If you want to use this for Silverlight or WPF, just change ‘Eventhandler<object>’ to ‘EventHandler’.

Code snippet for reading files in a Windows Store App

Here’s a little useful code snippet for opening up a file stream from either you local data store, or from the application folder in a Windows Store/WinRT/Metro/[insert name of the day] app:

using System;
using System.IO;
using System.Threading.Tasks;
using Windows.Storage;
using Windows.Storage.Streams;
using System.Runtime.InteropServices.WindowsRuntime;
//[...]
public static async Task<Stream> ReadFile(string filename)
{
    StorageFolder folder = null;
    if (filename.StartsWith("ms-appx:///"))
    {
        filename = filename.Substring(11);
        folder = Windows.ApplicationModel.Package.Current.InstalledLocation;
    }
    else
    {
        folder = Windows.Storage.ApplicationData.Current.LocalFolder;
    }
    while (filename.Contains("/"))
    {
        var foldername = filename.Substring(0, filename.IndexOf('/'));
        filename = filename.Substring(foldername.Length + 1);
        folder = await folder.GetFolderAsync(foldername).AsTask().ConfigureAwait(false);
    }
    var file = await folder.GetFileAsync(filename);
    IInputStream stream = await file.OpenReadAsync();
    DataReader reader = new DataReader(stream);
    return await file.OpenStreamForReadAsync();
}

This allows you to get access to a stream from your application. Ie. if you have a file called “About.txt” in your project inside the folder “Assets” (remember to set build action to ‘content’), you would access it like this:

using (var stream = await ReadFile("ms-appx:///Assets/About.txt"))
{
    //TODO
}

Note that the ms-appx:/// is the standard prefix for a uri to files within the application folder. If you want to get access to a file in your app data folder, just leave this off.