RefreshBox for Windows Phone 7

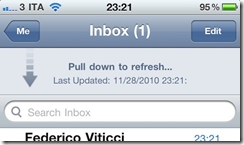
I always liked the simplicity in iPhone for refreshing a list of various feeds, for instance email, tweet, RSS etc. Basically when you get to the top of the list, you simply keep pulling and the app will check for the latest items:
image

I wanted something similar in my WinPhone application, and ventured out to make this. You could probably go and argue now that Windows Phone 7 shouldn’t be copying ideas from other phones but be its own, which is a somewhat fair argument, but when something just works, it just works. So yes this post is about totally ripping of an iPhone idea. I’ll admit that Smile

If you don’t care how this was done, just jump to the bottom to see the result in action, and/or download the bits.

Anyway, luckily creating a control like this wasn’t too hard. It starts with inheriting from the ListBox control which has all the list features needed. It also supports pulling beyond the contents of the list and when you let go, it “pops back” to the top item. So all I need to do, is :
1. Find a way to place an item in this “outside area”.
2. Detect that the user is pulling the list out in this area.

Placing the element in the outer area proved to be really simple. The ListBox template is basically just a ScrollViewer with an ItemsPresenter inside it. So all we need to do is place a grid with the contents on top of the ItemsPresenter with a negative vertical margin:

<ControlTemplate TargetType="local:RefreshBox"> 
    <ScrollViewer x:Name="ScrollViewer" ...> 
        <Grid> 
            <Grid Margin="0,-90,0,30" Height="60" VerticalAlignment="Top" x:Name="ReleaseElement"> 
                <!-- content goes here --> 
            </Grid> 
        </Grid> 
        <ItemsPresenter/> 
    </ScrollViewer> 
</ControlTemplate>

Sprinkle a little visual states in that content, and we would be able to change the message when we detect the user has been pulling beyond the threshold.

The first thing we do is get a reference to the ScrollViewer and the ReleaseElement during OnApplyTemplate(), and listen to MouseMove (the event that causes the scrolling) and ManipulationCompleted (triggered when the user lets go of the screen).

public override void OnApplyTemplate() 
{ 
    base.OnApplyTemplate(); 
    ElementScrollViewer = GetTemplateChild("ScrollViewer") as ScrollViewer; 
    if (ElementScrollViewer != null) 
    {            
        ElementScrollViewer.MouseMove += viewer_MouseMove; 
        ElementScrollViewer.ManipulationCompleted += viewer_ManipulationCompleted; 
    } 
    ElementRelease = GetTemplateChild("ReleaseElement") as UIElement;        
    ChangeVisualState(false); 
}

In MouseMove we can then check the VerticalOffset of the ScrollViewer. You would think this offset is negative, but it gets clamped at 0, so we can’t use that. Instead by calculating where the ReleaseElement is physically located gives us an idea of how far we pulled:

private void viewer_MouseMove(object sender, MouseEventArgs e) 
{ 
    if (VerticalOffset == 0) 
    { 
        var p = this.TransformToVisual(ElementRelease).Transform(new Point()); 
        if (p.Y < -VerticalPullToRefreshDistance) //Passed thresdhold : In pulling state area 
        {             
            //TODO: Update layout//visual states 
        } 
        else //Is not pulling 
        { 
            //TODO: Update layout/visual states 
        } 
    } 
}

Similarly, when you let go of the screen we make the same check and raise an event if necessary:

private void viewer_ManipulationCompleted(object sender, ManipulationCompletedEventArgs e) 
{ 
    var p = this.TransformToVisual(ElementRelease).Transform(new Point()); 
    if (p.Y < -VerticalPullToRefreshDistance) 
    { 
        //TODO: Raise Polled to refresh event 
    } 
}

So here’s that this looks like….

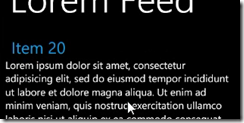
Scrolled to the top of the list:
image

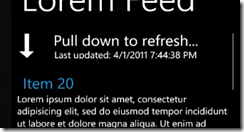
Pulling slightly down on the listbox beyond the top item:
image

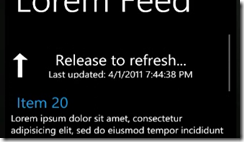
Pulling all the way down: Message tells you to let go to refresh:
image

And here’s what that look like in action:

You can download the code and binary for a fully skinnable control/reusable below here:

Source : SharpGIS.Controls.RefreshBox_source.zip (32.31 kb)

Binary : SharpGIS.Controls.RefreshBox_binary.zip (6.48 kb)

UPDATE: If you are using v7.1 (Mango), the above approach will only work if you set ScrollViewer.ManipulationMode ="Control" on the RefreshBox. See herefor details.

Using the accelerometer to control planar transforms on Windows Phone 7

Lately I’ve been looking into some Augmented Reality uses on Windows Phone 7, and one of the first things you need to do for this, is to use the sensors to control what’s displayed on the phone screen.

So the first step for me was to better understand how the accelerometer interacted with the phone’s orientation. I wanted to create a simple “3D Plane” that was always looked like it was “level”. This could be accomplished with a Rectangle and a PlaneTransform. The only question is: How do I transform the accelerometer values to the RotationX/Y/Z rotation angles on the PlaneTransform?

To make matters worse, depending on whether your phone is currently in Portrait, LandscapeLeft or LandscapeRight mode, the screen coordinate system, and thus the transforms changes, even though the accelerometer report the values independent of screen orientation. So to get a property transform, we also need to know what way the screen coordinate system is oriented relative to the accelerometer coordinate system.

With a little trigonometry it wasn’t too hard to figure out, so here’s the code to perform this little app.

First the border we used as the “level” plane:

<Border x:Name="plane" BorderBrush="Green" BorderThickness="2"
        Width="350" Height="350" >
    <Border.Projection>
        <PlaneProjection x:Name="proj"  />
    </Border.Projection>
</Border>

Next, create an accelerometer instance, and call “Update” every time we get a reading:

var meter = new Accelerometer();
meter.ReadingChanged += meter_ReadingChanged;
...
private void meter_ReadingChanged(object sender, AccelerometerReadingEventArgs e)
{
    Dispatcher.BeginInvoke(() =>
    {
        UpdateRotation(e.X,e.Y.e.Z);
    });
}

Lastly, update the PlaneProjection parameters, based on the rotation (this is where the “real meat” is):

private void UpdateRotation(double x, double y, double z)
{
    var offset = 0d;
    //Adjust for screen orientation when in landscape mode
    //PortraitUp mode doesn't need an offset
    if (Orientation == PageOrientation.LandscapeLeft) offset = .5;
    else if (Orientation == PageOrientation.LandscapeRight) offset = 1.5;                

    var rx = (Math.Acos(z) / Math.PI + 1) * 180;
    var rz = (offset - Math.Atan2(x, y) / Math.PI + 1) * 180;
    if(!double.IsNaN(rz)) proj.RotationZ = rz;
    if(!double.IsNaN(rx)) proj.RotationX = rx;
}

And lastly, here’s what this looks like (note how the screen orientation flips when the phone is rotated, but the plane stays in the same place):

Note that this sample doesn’t deal with calibration. I suggest you look at this blogpost on how to do that. It also includes a lot of information on the accelerometer in general. That blog also discusses filtering the noisy data which is important to give a smooth looking result. The sample code you can download below, includes a simple low-pass filter to make it feel a lot smoother.

Download source code

Lastly here’s an example/preview of a little Augmented Reality app I’ve been working on that is using this approach to overlay the camera feed with azimuth values:

Submitted my first WinPhone 7 Application

imageI’ve just submitted my first application to the Windows Phone Marketplace. It’s a very simple app that creates a “Guide Post” with signs on a pole showing distances and direction to any point in the world. You have probably seen these at various sites all over the world, or in the TV Show “M*A*S*H”.

It’s all built in Silverlight, and uses PlaneProjection to give give the signs a 3D effect. You use your finger to slider over the screen to rotate it.

In addition to that there’s a Map where you can view your current location and the great circle line (ie. shortest path) between you and the points of interest. This is of course using the ESRI ArcGIS API for Windows Phone that we just released.

Below is a few screenshots and a video clip of the app in action.

screen_12-1-2010_8.51.30.996screen_12-1-2010_8.50.48.336
screenshot_12-2-2010_12.26.46.864screenshot_12-2-2010_12.27.59.830

GuidePost Screen Capture

It was a great fun little app to build and only took a few evenings to get done. You can download the app to your phone from this link: http://bit.ly/WP7GP