Creating a simple push service for home automation alerts

In my intro post for my home automation project, I described a part of the app that sends temperature, humidity and power consumption measurements and pushes them to my phone. In this blogpost, we’ll build a simple console-webservice that allows a phone to register itself with the service, and the service can push a message to any registered device using the Windows Notification Service. Even if you’re not building a home automation server, but just need to figure out how to push a message to your phone or tablet, this blogpost is still for you (but you can ignore some of the console webservice bits).

To send a push message via WNS to an app, you need the “phone number of the app”. This is a combination of the app and the device ID. If you know this, and you’re the owner for the app, you are able to push messages to the app on the device. It’s only the app on the device that knows this phone number. If the app wants someone to push a message to the device, it will need go share it with that someone. But for this to work, you will first have to register the app on the Microsoft developer portal and associate your project with the app in order to be able to create a valid “phone number”.

Here’s the website after registering my app “Push_Test_App”. You simply create a new app, and only need to complete step 1 to start using WNS.

image

Next you will need to associate your app with the app you created in the store from the following menu item:

image

Simply follow the step-by-step guide. Note that the option is only available for the active startup-up project. Repeat this for both the store and phone app if you’re creating a universal project (make sure to change the startup project to get the menu item to relate to the correct project).

This is all we need to do to get the app’s “phone number”  the “channel uri”. We can get that using the following line of code:

var channel = await PushNotificationChannelManager.CreatePushNotificationChannelForApplicationAsync();
var uri = channel.Uri;

Notice that the channel.Uri property is just a URL. This is the URL to the WNS service where we can post stuff to. The WNS service will then forward the message you send to your app on the specific device.

Next step is to create a push service. We’ll create two operations: A webservice that an app can send the channel Uri to, and later an operation to push messages to all registered clients.

We’ll first build the simple console app webserver. Some of this is in part based http://codehosting.net/blog/BlogEngine/post/Simple-C-Web-Server.aspx where you can get more details.

The main part to notice is that we’ll start a server on port 8080, and we’ll wait for a call to /registerPush with a POST body containing a json object with channel uri and device id:

using System;
using System.Net;
using System.Runtime.Serialization;
using System.Runtime.Serialization.Json;
using System.Threading;

namespace PushService
{
    internal class HttpWebService
    {
        private HttpListener m_server;
        
        public void Start()
        {
            ThreadPool.QueueUserWorkItem((o) => RunServer());
        }

        private void RunServer()
        {
            Int32 port = 8080;
            m_server = new HttpListener();
            m_server.Prefixes.Add(string.Format("http://*:{0}/", port));
            m_server.Start();
            while (m_server.IsListening)
            {
                HttpListenerContext ctx = m_server.GetContext();
                ThreadPool.QueueUserWorkItem((object c) => ProcessRequest((HttpListenerContext)c), ctx);
            }
        }

        public void Stop()
        {
            if (m_server != null)
            {
                m_server.Stop();
                m_server.Close();
            }
        }

        private void ProcessRequest(HttpListenerContext context)
        {
            switch(context.Request.Url.AbsolutePath)
            {
                case "/registerPush":
                    HandlePushRegistration(context);
                    break;
                default:
                    context.Response.StatusCode = 404; //NOT FOUND
                    break;
            }
            context.Response.OutputStream.Close();
        }

        private void HandlePushRegistration(HttpListenerContext context)
        {
            if (context.Request.HttpMethod == "POST")
            {
                if (context.Request.HasEntityBody)
                {
                    System.IO.Stream body = context.Request.InputStream;
                    System.Text.Encoding encoding = context.Request.ContentEncoding;
                    System.IO.StreamReader reader = new System.IO.StreamReader(body, encoding);
                    DataContractJsonSerializer s = new DataContractJsonSerializer(typeof(RegistrationPacket));
                    var packet = s.ReadObject(reader.BaseStream) as RegistrationPacket;
                    if (packet != null && packet.deviceId != null && !string.IsNullOrWhiteSpace(packet.channelUri))
                    {
                        if (ClientRegistered != null)
                            ClientRegistered(this, packet);
                        context.Response.StatusCode = 200; //OK
                        return;
                    }
                }
            }
            context.Response.StatusCode = 500; //Server Error
        }

        /// <summary>
        /// Fired when a device registers itself
        /// </summary>
        public event EventHandler<RegistrationPacket> ClientRegistered;


        [DataContract]
        public class RegistrationPacket
        {
            [DataMember]
            public string channelUri { get; set; }
            [DataMember]
            public string deviceId { get; set; }
        }
    }
}

Next let’s start this service in the console main app. We’ll listen for clients registering and store them in a dictionary.


private static Dictionary<string, Uri> registeredClients = new Dictionary<string, Uri>(); //List of registered devices

static void Main(string[] args)
{
    //Start http service
    var svc = new HttpWebService();
    svc.Start();
    svc.ClientRegistered += svc_ClientRegistered;

    Console.WriteLine("Service started. Press CTRL-Q to quit.");
    while (true)
    {
        var key = Console.ReadKey();
        if (key.Key == ConsoleKey.Q && key.Modifiers == ConsoleModifiers.Control)
            break;
    }
    //shut down
    svc.Stop();
}
        
private static void svc_ClientRegistered(object sender, HttpWebService.RegistrationPacket e)
{
    if(registeredClients.ContainsKey(e.deviceId))
        Console.WriteLine("Client updated: " + e.deviceId);
    else
        Console.WriteLine("Client registered: " + e.deviceId);
    
    registeredClients[e.deviceId] = new Uri(e.channelUri); //store list of registered devices
}

Note: You will need to launch this console app as admin to be able to open the http port.

Next, let’s add some code to our phone/store app that calls the endpoint and sends its channel uri and device id (we won’t really need the device id, but it’s a nice way to identify the clients we have to push to and avoid duplicates). We’ll also add a bit of code to handle receiving a push notification if the server was to send a message back (we’ll get to the latter later):

private async void ButtonRegister_Click(object sender, RoutedEventArgs e)
{
    var channel = await PushNotificationChannelManager.CreatePushNotificationChannelForApplicationAsync();
    var uri = channel.Uri;
    channel.PushNotificationReceived += channel_PushNotificationReceived;
    RegisterWithServer(uri);
}

private async void RegisterWithServer(string uri)
{
    string IP = "192.168.1.17"; //IP address of server. Replace with the ip/servername where your service is running on
    HttpClient client = new HttpClient();

    DataContractJsonSerializer s = new DataContractJsonSerializer(typeof(RegistrationPacket));
    RegistrationPacket packet = new RegistrationPacket()
    {
        channelUri = uri,
        deviceId = GetHardwareId()
    };
    System.IO.MemoryStream ms = new System.IO.MemoryStream();
    s.WriteObject(ms, packet);
    ms.Seek(0, System.IO.SeekOrigin.Begin);
    try
    {
        //Send push channel to server
        var result = await client.PostAsync(new Uri("http://" + IP + ":8080/registerPush"), new StreamContent(ms));
        Status.Text = "Push registration successfull";
    }
    catch(System.Exception ex) {
        Status.Text = "Push registration failed: " + ex.Message;
    }
}

//returns a unique hardware id
private string GetHardwareId()
{
    var token = Windows.System.Profile.HardwareIdentification.GetPackageSpecificToken(null);
    var hardwareId = token.Id;
    var dataReader = Windows.Storage.Streams.DataReader.FromBuffer(hardwareId);

    byte[] bytes = new byte[hardwareId.Length];
    dataReader.ReadBytes(bytes);
    return BitConverter.ToString(bytes);
}

[DataContract]
public class RegistrationPacket
{
    [DataMember]
    public string channelUri { get; set; }
    [DataMember]
    public string deviceId { get; set; }
}

//Called if a push notification is sent while the app is running
private void channel_PushNotificationReceived(PushNotificationChannel sender, PushNotificationReceivedEventArgs args)
{
    var content = args.RawNotification.Content;
    var _ = Dispatcher.RunAsync(Windows.UI.Core.CoreDispatcherPriority.Normal, () =>
    {
        Status.Text = "Received: " + content; //Output message to a TextBlock
    });
}

Now if we run this app, we can register the device with you service. When you run both, you should see a “client registered” output in the console. If not, check your IP and firewall settings.

Lastly, we need to perform a push notification. The basics of it is to simply post some content to the url. However the service will need to authenticate itself using OAuth. To authenticate, we need to go back to the dev portal and go to the app we created. Click the “Services” option:

image

Next, go to the subtle link on the following page (this link isn’t very obvious, even though it’s the most important thing on this page):

image

The next page has what you need. Copy the highlighted Package SID + Client Secret on this page. You will need this to authenticate with the WNS service.

image

The following helper class creates an OAuth token using the above secret and client id, as well as provides a method for pushing a message to a channel uri using that token:

using System;
using System.IO;
using System.Net;
using System.Runtime.Serialization;
using System.Runtime.Serialization.Json;
using System.Text;
using System.Web;

namespace PushService
{
    internal static class PushHelper
    {
        public static void Push(Uri uri, OAuthToken accessToken, string message)
        {
            HttpWebRequest request = HttpWebRequest.Create(uri) as HttpWebRequest;
            request.Method = "POST";
            //Change this depending on the type of notification you need to do. Raw is just text
            string notificationType = "wns/raw";
            string contentType = "application/octet-stream";
            request.Headers.Add("X-WNS-Type", notificationType);
            request.ContentType = contentType;
            request.Headers.Add("Authorization", String.Format("Bearer {0}", accessToken.AccessToken));

            byte[] contentInBytes = Encoding.UTF8.GetBytes(message);
            using (Stream requestStream = request.GetRequestStream())
                requestStream.Write(contentInBytes, 0, contentInBytes.Length);
            try
            {
                using (HttpWebResponse webResponse = (HttpWebResponse)request.GetResponse())
                {
                    string code = webResponse.StatusCode.ToString();
                }
            }
            catch (Exception)
            {
                throw;
            }
        }

        public static OAuthToken GetAccessToken(string secret, string sid)
        {
            var urlEncodedSecret = HttpUtility.UrlEncode(secret);
            var urlEncodedSid = HttpUtility.UrlEncode(sid);

            var body =
              String.Format("grant_type=client_credentials&client_id={0}&client_secret={1}&scope=notify.windows.com", urlEncodedSid, urlEncodedSecret);

            string response;
            using (var client = new System.Net.WebClient())
            {
                client.Headers.Add("Content-Type", "application/x-www-form-urlencoded");
                response = client.UploadString("https://login.live.com/accesstoken.srf", body);
            }
            using (var ms = new MemoryStream(Encoding.Unicode.GetBytes(response)))
            {
                var ser = new DataContractJsonSerializer(typeof(OAuthToken));
                var oAuthToken = (OAuthToken)ser.ReadObject(ms);
                return oAuthToken;
            }
        }
    }

    [DataContract]
    internal class OAuthToken
    {
        [DataMember(Name = "access_token")]
        public string AccessToken { get; set; }
        [DataMember(Name = "token_type")]
        public string TokenType { get; set; }
    }
}

Next let’s change our console main method to include pushing a message to all registered clients when pressing ‘S’. In this simple sample we’ll just push the current server time.

static void Main(string[] args)
{
    //Start http service
    var svc = new HttpWebService();
    svc.Start();
    svc.ClientRegistered += svc_ClientRegistered;

    Console.WriteLine("Service started. Press CTRL-Q to quit.\nPress 'S' to push a message.");
    while (true)
    {
        var key = Console.ReadKey();
        if (key.Key == ConsoleKey.Q && key.Modifiers == ConsoleModifiers.Control)
            break;
        else if(key.Key == ConsoleKey.S)
        {
            Console.WriteLine();
            PushMessageToClients();
        }
    }
    //shut down
    svc.Stop();
}

private static void PushMessageToClients()
{
    if (registeredClients.Count == 0)
        return; //no one to push to

    //Message to send to all clients
    var message = string.Format("{{\"Message\":\"Current server time is: {0}\"}}", DateTime.Now);

    //Generate token for push

    //Set app package SID and client clientSecret (get these for your app from the developer portal)
    string packageSid = "ms-app://s-X-XX-X-XXXXXXXXX-XXXXXXXXXX-XXXXXXXXX-XXXXXXXXXX-XXXXXXXXXX-XXXXXXXXXX-XXXXXXXXXX";
    string clientSecret = "XXXXXXXXXXXXXXXXXXXXXXXXXXXXXXXX";
    //Generate oauth token required to push messages to client
    OAuthToken accessToken = null;
    try
    {
        accessToken = PushHelper.GetAccessToken(clientSecret, packageSid);
    }
    catch (Exception ex)
    {
        Console.WriteLine("ERROR: Failed to get access token for push : {0}", ex.Message);
        return;
    }

    int counter = 0;
    //Push the message to all the clients
    foreach(var client in registeredClients)
    {
        try
        {
            PushHelper.Push(client.Value, accessToken, message);
            counter++;
        }
        catch (Exception ex)
        {
            Console.WriteLine("ERROR: Failed to push to {0}: {1}", client.Key, ex.Message);
        }
    }
    Console.WriteLine("Pushed successfully to {0} client(s)", counter);
}

Now run the console app and the phone/store app. First click the “register” button in your app, then in the console app click “S” to send a message. Almost instantly you should see the server time printed inside your app.

image


Note: We’re not using a background task, so this will only work while the app is running. In the next blogpost we’ll look at how to set this up, as well as how to create a live tile with a graph on it.

You can download all the source code here: Download (Remember to update the Packet SID/Client Secret and associate the app with your own store app).

Internet of Things blog series

For those who have been following me on twitter, you might have noticed I’ve been playing a lot with home automation lately. I’m planning on blogging about my experiences, and how some of the pieces are put together. At this point it’s far from a full solution – just a lot of pieces and custom ugly code wired together to get some things going. In the long term, I hope to have a fully configurable and extensible home automation system, but that would probably take me a few years to get there. This is the first in a series of blogs about my experiences, and why I’m doing it the way I am. I would love to hear your inputs and ideas in the comments.

In this first post I’m going to talk about what hardware my system consists off.

Devices, protocols etc.

There’s a lot of “internet of things” devices out there already today. Unfortunately there’s also a lot of standards. And a lot of competition to get the standards to succeed. It’s like the VHS vs Betamax wars right now. Any or all might win. And some systems supports multiple. Of some of the main ones on the market today:

  1. Insteon / X10
  2. Z-Wave
  3. Zigbee

These standards allow devices to talk together using a common protocol, but they usually need a hub or bridge to configure it all. Several companies have then built controller hubs or bridges on top of these standards. This is where I think the entire system starts breaking down: Each company doesn’t want to help the other company, and that means each company has their own standards for talking to the controller, their website or no API at all. Another thing I’ve noticed: Most of these systems only work if you’re connected to the internet (if so the controller is usually called a “gateway”). If your internet is down you suddenly can’t control your house, your sprinklers might not run, AC is inoperable etc. And you also put a lot of trust in to that company’s security. The Heartbleed drama is a good example of why I find this really concerning. Especially considering that from their website you can see if anyone is home, disable the alarm and cameras and unlock the door, then put it all back in place as if nothing happened when they are done robbing your house. Add to that, that many controllers only works connected if you also purchase a subscription.

Lastly because all the controllers that do offer APIs, are all different. That means if I were to build a Home Automation App, I would have to either choose one of the controllers and have vendor-lock-in, meaning I would severely reduce the number of people who could use my app. Or I would have to buy all the controllers out there and build an abstraction layer. Neither of this I found very appealing either – especially considering the winning standards is still unknown.

So instead I started something else: I created my own controller software, and started to put some abstraction in into it, and uses MEF to allow extending it with more controllers – allowing others to contribute with plugins. The controller service software runs on my home PC, and is running completely offline. It’s really an “Intranet of Things”. When my phone is on the home wifi, it can talk directly to the server, and register for push updates, and the server software can push notifications to my phone, even when I’m not on the wifi. This allows me to do one-way monitoring of my phone. And if I need direct access, I can always VPN home. Lastly by not relying on a server online, I don’t have to pay, manage, scale, deal-with, build, setup etc any cloud services. It’s all self-contained – however it doesn’t prevent me from pushing data out on the internet, or connecting to a cloud service if I really wanted to.

I recently got a Galileo device, and ultimately I want to make this service run on this: image
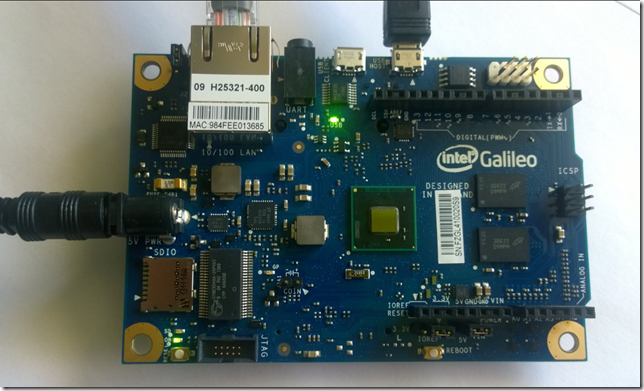
This is just a command-line version of Windows running on a really cheap piece of hardware. That means anyone could use my server software very cheap, or just install it on a PC. Well… that’s the long term plan anyway. The WindowsOnDevices version is still in its early stages and doesn’t have everything I need yet. So for now, it runs on my PC.

The hardware I’m using

I settled on the Zigbee standard for myself (for now). I like some of the promises of Zigbee as well as some of the supported devices out there. Some of the reasons I went with Zigbee:

  • Zigbee is an extremely low-power mesh network. The mesh network means the more devices you have, the better/stronger network you have. Some devices can run 10 years on a tiny battery.
  • A lot of utility companies have chosen this standard to allow you to read your power consumption real-time as well as current KwH cost, total consumption etc.
  • More and more companies seems to be adding support for it, meaning device prices are slowly coming down.
  • Philips Hue lights uses Zigbee (these lights are cool!).
  • The Nest Thermostat has a zigbee radio - not yet(?) enabled though. I’m keeping my fingers crossed…
  • A friend of mine gave me a Zigbee USB controller Smile
  • The USB controller I got works directly with the Zigbee network giving me full very fine-grained control (but see cons further down)

There are some cons with Zigbee too though.

  • License cost for Zigbee means the devices can be a little pricy.
  • There’s several sub-standards. Zigbee HA is for home automation. Zigbee SE is a more secure version used for your smart meters. You’ll need two separate controllers to monitor both (at least they are very similar to talk to though).
  • The standard is very flexible, which means it’s also pretty complex. Some controllers abstracts this away though (not mine).
  • In addition there’s a new “light link” standard for HA that the Philips Hue lights run on – I believe this allow it to run controller-less. Unfortunately my HA controller doesn’t support Light Link, and the manufacturer still hasn’t updated the firmware (which btw I can’t even update myself).
  • The USB Controller (or ‘coordinator’ in ZigBee speak) I have is using a VERY low-level API. It’s a lot of bit-wise operators and working with raw binary data coming in and out. It was a LOT of work just getting it working somewhat. And if you choose a different controller, most or none of my zigbee code is re-useable.

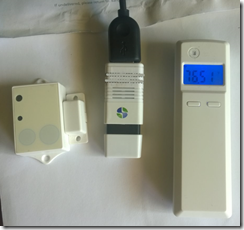
Here’s a picture of a door/window sensor, the USB coordinator and a temperature/humidity sensor.
image

The door sensor only uses power when it opens or closes – it’s estimated battery life is 10 years. The Temp/Humidity sensor reports measurements every 3 mins (configurable), and should last about 3 years. I have a a couple of these, plus more door sensors on the way, as well as a Philips Hue light bulb.

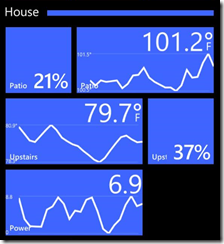
At this point, I wrote a little piece of software of my PC that monitors messages coming in on the ZigBee network, and turns them into push notifications. It creates a nice live-tile graph of temperature , humidity (inside and out) and recent power consumption (I’ll blog about this in a later article).
image

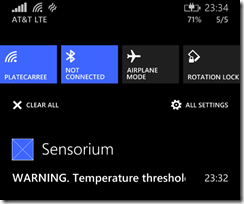
It even allows me to configure alerts when a value exceeds a certain level:
image

This is actually very useful when I brew beer. Since I don’t have a temperature-controlled brew-keg, this is the second best. I put the sensor in with the keg, and I get alerts on my phone when the wort is too hot or cold.
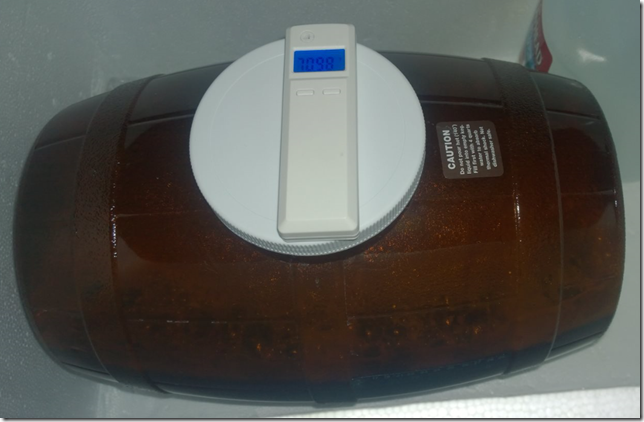
image

I addition I can also monitor my power consumption using a separate (but similar) Zigbee SE receiver. It sends the same graph to my phone, but my local app monitors changes in usage down to the second (I push the usage graph a lot rarer to save phone battery). It’s interesting to see what uses power and not, and how much drain it causes. You can actually see a light turn on, or when the fridge thermostat turns on and off. It’s very educational about your power consumption, and how much standby power you use. You can also read what the current cost of electricity is to help you make certain decisions.
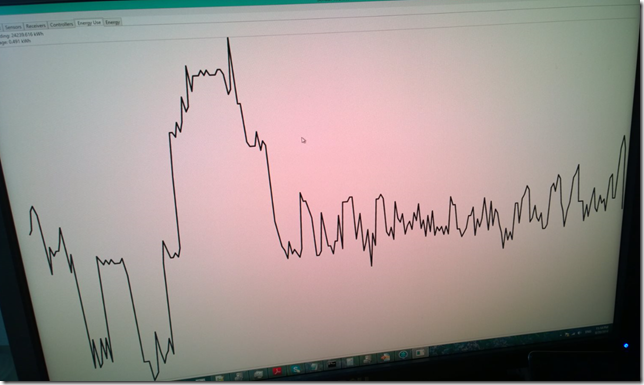
image

I also recorded a video of this here: 1liLQbq. You can see the graph jump 1-2 seconds after I turn a light on or off.

Some of the code for working with the Zigbee USB receiver I’ve put on Github – it’s still in a slightly rough state though: https://github.com/dotMorten/ZigbeeNet

More devices…

California is in a severe drought right now. That means there’s a lot of water restrictions in effect, including what days you can water, and what types of watering you’re allowed to do. The sprinkler time I had couldn’t automatically do this, so I just bought a new one. OpenSprinkler which is an open-source Arduino based controller. It can connect to the local network and be remotely controlled. It even has a little REST API (albeit fairly undocumented but source code is available for reverse engineering).
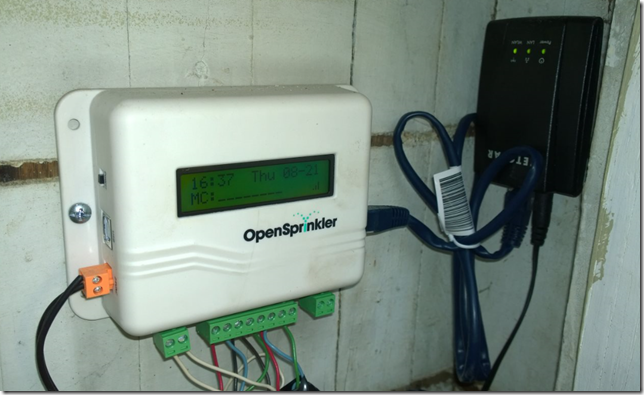
image

While the software and web interface is pretty simple, it actually works very well. It even has a Windows Phone and Windows store app (based on Cordova). I’ve also started a little project to build a .NET API for this controller so I can integrate it into my “system”. Source-code for that is all available on Github: https://github.com/dotMorten/OpenSprinklerNet

I also have a couple of ZigBee-supported AC thermostats on the way, as well as some better and prettier window sensors that I would actually considering putting up (it’s beyond me why anyone would make such an ugly sensor to mount on all windows).

What’s next

I want to build an “If this then that” style configuration for my server software. Currently all I can do is push measurements out. Next is to set up rules and make things happen with the rules are satisfied. For example “If air condition is running and a window is open, send alert”. Or “If phone/me leaves the house and a window is open, alert” Or “if it was hot, windy and dry yesterday, increase lawn watering”. Or “If outside temperature and humidity is at a certain level and inside humidity doesn’t exceed a certain level, switch from air condition to swamp cooler”.  The last example is actually what got me started: I have two air condition units (upstairs and downstairs), 5 whole-house fans, and two swamp-coolers. What’s more efficient to run (or combination thereof), is quite tricky and also depends on outside and inside conditions. I live in a very old house with really poor insulation, so choosing the cheapest cooling system during the very hot summers here could save me a lot of money. A fancy rule-based system for making those decisions is what I really need. Add to that, I could tweak that decision making using weather forecasts, my current location (or my phone’s that is), and the current electricity cost.

And I want to make it pluggable. It shouldn’t just be Zigbee, or just the devices I have. I want to make it so that you can quickly add more devices and protocols by adding a plugin. It’s definitely quite a software engineering task – if you have some experience with this, I’d love to hear your design ideas. I’ll put it all on Github for people to use – and hopefully to contribute.

Then next, would be getting it all to run on the Galileo board, but there’s still some .NET and USB support lacking so for now it’ll run on a PC.

It’s a big task – it’ll take some work and time. So in the mean time I’ll be blogging about how some of the pieces are built. Stay tuned…

Fixing Visual Studio’s auto generated code

I usually have a zero-tolerance when it comes to build warnings. While granted often the warnings are benign, having a lot will very often hide the important ones. Sometimes I even set the option “treat warnings as errors” to help me enforce this. When you’re building a library, you should also add XML doc comments to your classes and members, so you get full intellisense support in the projects you’re using it from. Just remember to check off the following check box:

image

This also have the benefit of giving you warnings for missing doc comments on public members, so you remember to write proper doc. However if you’re building for Windows Store or Phone, there’s a good chance you’ll see these four warnings now:

image

These are coming from code auto-generated by the compiler which exposes a set of public classes. You can even see these in intellisense:

image

This is a major issue in my mind. First of all it introduces warnings in code you didn’t write, and it pollutes your class library with methods that are not meant to be used. Here’s what this auto-generated class looks like:

image

The fix seems simple: Just go in and add the doc comments, and problem is solved, right? Not really. The problem is any changes you make to this file is overwritten every time you build. So we need to tweak the file right after it’s being generated, but right before it’s being compiled, but who’s that fast?

Enter: The Build Task

We can use a build task to do exactly that, and tell Visual Studio to let us know that its about to compile the code and fix it ourselves.

First create a new empty Windows Class Library, and add the following two references:

image

Next add the following class and compile:

XamlTypeInfoBuildTask.cs

using Microsoft.Build.Framework;
using Microsoft.Build.Utilities;
using System;

namespace XamlBuildTasks
{
    public class XamlTypeInfoBuildTask : Task
    {
        private const string XamlTypeInfoFileName = "XamlTypeInfo.g.cs";

        [Required]
        public string IntermediateOutputPath { get; set; }       
       
        public override bool Execute()
        {
            string filename = IntermediateOutputPath + XamlTypeInfoFileName;
            if (!System.IO.File.Exists(filename))
                return false;
            string code = System.IO.File.ReadAllText(filename);

            if (code.StartsWith("#pragma warning disable 1591")) //Already modified
                return true;
            int idx = code.IndexOf("[System.CodeDom.Compiler.GeneratedCodeAttribute");
            if (idx < 0)
                return false;
            string insert = "[System.ComponentModel.EditorBrowsable(System.ComponentModel.EditorBrowsableState.Never)]\n";
            code = "#pragma warning disable 1591\n" + code.Substring(0, idx) + insert + code.Substring(idx) +
                "#pragma warning restore 1591\n";
            System.IO.File.WriteAllText(filename, code);
            return true;
        }
    }
}

What does this class do? Simple: It has one property: The folder where the intermediate files including XamlTypeInfo.g.cs is. It then opens the file to be modified, and first injects “#pragma warning disable 1591” at the header which disables doc warnings, and re-enables it again at the bottom. At the same time we hide the class from intellisense, by setting the EditorBrowsable attribute on the class. This doesn’t really remove the class from the assembly – it just tells Visual Studio to skip showing this for intellisense.

To use this build-task, we need to add a little bit to the project file that causes this issue. We’ll first create a .targets file with the parameters for buildtask. Place this next to the compiled DLL (and use the name of the dll where highlighted):

XamlTypeInfoBuildTask.targets

<Project xmlns="http://schemas.microsoft.com/developer/msbuild/2003">
  <UsingTask TaskName="XamlTypeInfoBuildTask"
            AssemblyFile="$(MSBuildThisFileDirectory)XamlBuildTask.dll" />
  <Target Name="MyBuildTask" AfterTargets="MarkupCompilePass2" BeforeTargets="CoreCompile">
    <XamlTypeInfoBuildTask IntermediateOutputPath="$(IntermediateOutputPath)" />
  </Target>
</Project>

This tells the project to run this before the compilation after the markup has been processed. It also sets the IntermediateOutputPath property on our build task, so the build task can find the file.

Now the last step is to reference this .targets file from the csproj file. Open the csproj file up in notepad, and scroll down to the <Import…/> tags, and add the following (remember to modify the highlighted paths to where the targets file is:

  <Import Project="..\..\..\build\XamlTypeInfoBuildTask.targets" Condition="Exists('..\..\..\build\XamlTypeInfoBuildTask.targets')" />

Now when we build, we get a nice pretty build with no warnings:

image

And here’s all the auto-generated classes, gone from intellisense:

image

Making all this simpler

Naturally this is a bit of a pain having to set up over and over again. So unless you ever have to do a similar build task, you can forget everything you just read (sorry Smile), and just use the Nuget package I created that’ll do all this for you.

Simply add a reference to this nuget package, and the build task dll is downloaded and the .targets file auto-referenced.

And if you want the source code? It’s all available here on Github: https://github.com/dotMorten/XamlTypeInfoBuildTask

Enjoy!

Create Universal Map App In Under 2 Minutes

We just released the second beta drop of the 'ArcGIS Runtime for .NET SDK', which now supports both Windows Store 8.1, Windows Phone 8.1 in addition to WPF. This means you can now build universal apps with a map control that supports all these platforms. We also released the package on NuGet for your convenience.

As a demonstration how quick it is to create a Windows Phone and Windows Store app, here's a little video creating a universal map app from scratch in 80 seconds:


Note: The nuget package currently doesn't support WPF. You will need to download the full setup to get WPF support as well, instead of using the nuget version.

Behind the scenes of “Universal Apps”

At Build 2014, Microsoft announced the new ‘Universal Apps’ project type that allows you to share code between Windows Phone and Windows Store apps, using a new ‘shared’ project. Below is an example of the default hub project that shares a lot of the code has individual views for the parts where you want to tweak the UI specifically for phone or tablets.

image

Before we had shared projects, we could do something similar, by linking the same code files into multiple projects. It worked fairly well, but which ever project you open the file from, is the ‘context’ you look at it, so intellisense etc might not match the platform you’re looking at. The universal apps really aren’t any different. This is really just a nice tooling on top of linked files that makes it easier to work with. Also it is much easier to change the ‘context’ the code is viewed in using a simple dropdown above your code:

image

As shown above, you can still use compiler conditionals to write individual differences for each platform and still share the rest of the code file. So again this is the same as when working with linked files, but the shared project makes this much easier.

So how does this really work? If we look in the project file for Windows Phone or Windows Store project you’ll find the highlighted tag:

image

So the specific project simply references another project – kind of like how a linked file works, but in this case an entire group of files. Looking in the shared project that’s references, you find a fairly simple file, but this in turn references a file called [ProjectName].Shared.projitems, and the contents of this is really just a standard project with the files etc that needs to be referenced in the referencing project.

image

image

The last piece to the puzzle is in the .sln solution file that makes sure the projects are nicely grouped together. There’s two parts to the solution that makes this work:

image

image

The Guids are the project guids referencing the projects that needs to be grouped as a universal project.

Microsoft only gives you the tooling to do Windows Store and Windows Phone Universal projects. However knowing how this now works, it makes you wonder if you can manually go add the Shared Project reference to for example your WPF application, and add it to the solution under the nested project parts. And in fact you can! Below is an example of the ArcGIS Runtime Toolkit (which today uses linked files to compile for Store, Phone and WPF): Note how ‘Generic.xaml’ is the only file not shared, because the UI has been optimized for each platform, and also WPF XAML isn’t compatible with Store and Phone. Again the Universal Apps makes this really easy to manage files you don’t want shared.

image

And the context switcher now also shows a third option:

image

In fact I can make a shared project that’s used in a Windows Store, Windows Phone, WPF, Silverlight, Console, Windows Forms etc etc! Of course at some point the platforms are so different the amount of code that is shared will be reduced, but I find this as a great alternative to PCL without the limitations of PCLs.

Talking to the people behind this feature, this functionality does come with a warning: First of all this hasn’t been extensively tested, so you might hit issues with it. Another thing to be careful with is build actions. For example if you want to share image Assets, you want to set the build action to ‘Content’ for Windows Phone and Windows Store, but in WPF you want to set it to ‘Resource’, and this naturally isn’t supported (but you can still used linked files in the individual projects to work around this).

The layout of an ExtensionSDK

Extension SDKs are a very powerful way distribute your control libraries for use in Windows Store and Windows Phone apps.
This article will go through the layout of the extension sdk, and later take that knowledge to build an extension sdk from an already released app.

An ExtensionSDK essentially consists of 3 parts:

  • Files to use during design time
  • Files to deploy as content
  • Assemblies to use for reference

In addition there's a metadata file 'SDKManifest.xml' that describes the content.

The root layout then looks like the following:
    \EXTENSIONNAME\VERSION\DesignTime\
    \EXTENSIONNAME\VERSION\Redist\
    \EXTENSIONNAME\VERSION\References\
    \EXTENSIONNAME\VERSION\SDKManifest.xml
…where 'EXTENSIONAME' is the name of your extension, and VERSION is version number in the format "1.2.3.4".
   
For each of these groups you can control what gets deployed in debug and release or both. If you don't want to control whether you use debug or release, you will below these folders use the folder 'CommonConfiguration'. For debug specific configuration use 'Debug', and for release configuration use 'Retail'. In most case you will be using 'CommonConfiguration' though.
This means our folder structure now looks like this:
    \EXTENSIONNAME\VERSION\DesignTime\CommonConfiguration\
    \EXTENSIONNAME\VERSION\Redist\CommonConfiguration\
    \EXTENSIONNAME\VERSION\References\CommonConfiguration\

Next level down in the folders describe if files are related to AnyCPU, x86, x64 or ARM builds (the latter is very useful for C++ projects). For AnyCPU use 'neutral', meaning it doesn't matter. So use this for .NET Assemblies compiled for AnyCPU, image resources, winmd files etc. You will want to use the architecture specific folder if you deploy binaries that are architecture specific.

So what goes in what folders:

  • DesignTime: This is where you will put .Design assemblies if you have specific design time binaries for your assemblies, as well as Generic.xaml. You only need to deploy 'neutral' and/or 'x86' architectures, since VS runs in a 32bit process.
  • Redist: Images, shaders, Generic.xbf, videos etc, AND C++ binaries.
  • References: .NET DLLs, C++ WinMDs, xml doc.

Here's an example layout of an extension sdk that consists of two libraries: One C++ WinRT component (NativeLib) and a Managed library:
    \MyControlLib\1.0.0.0\SDKManifest.xml
    \MyControlLib\1.0.0.0\DesignTime\CommonConfiguration\neutral\ManagedLib\Themes\Generic.xaml
    \MyControlLib\1.0.0.0\DesignTime\CommonConfiguration\x86\ManagedLib.Design.dll
    \MyControlLib\1.0.0.0\Redist\CommonConfiguration\neutral\ManagedLib.pri
    \MyControlLib\1.0.0.0\Redist\CommonConfiguration\neutral\NativeLib.pri
    \MyControlLib\1.0.0.0\Redist\CommonConfiguration\neutral\ManagedLib\Icon.png
    \MyControlLib\1.0.0.0\Redist\CommonConfiguration\neutral\ManagedLib\Themes\Generic.xbf
    \MyControlLib\1.0.0.0\Redist\CommonConfiguration\neutral\NativeLib\shaders\PixelShader.cso
    \MyControlLib\1.0.0.0\Redist\CommonConfiguration\neutral\NativeLib\shaders\VertexShader.cso
    \MyControlLib\1.0.0.0\Redist\CommonConfiguration\ARM\NativeLib.dll
    \MyControlLib\1.0.0.0\Redist\CommonConfiguration\x86\NativeLib.dll
    \MyControlLib\1.0.0.0\Redist\CommonConfiguration\x64\NativeLib.dll
    \MyControlLib\1.0.0.0\References\CommonConfiguration\neutral\NativeLib.winmd
    \MyControlLib\1.0.0.0\References\CommonConfiguration\ARM\ManagedLib.dll
    \MyControlLib\1.0.0.0\References\CommonConfiguration\ARM\ManagedLib.xml
    \MyControlLib\1.0.0.0\References\CommonConfiguration\x64\ManagedLib.dll
    \MyControlLib\1.0.0.0\References\CommonConfiguration\x64\ManagedLib.xml
    \MyControlLib\1.0.0.0\References\CommonConfiguration\x86\ManagedLib.dll
    \MyControlLib\1.0.0.0\References\CommonConfiguration\x86\ManagedLib.xml

The SDKManifest could look like the following:

    <?xml version="1.0" encoding="utf-8" ?>
    <FileList
      xmlns:xsi="
http://www.w3.org/2001/XMLSchema-instance"
      xsi:noNamespaceSchemaLocation="SDKManifest.xsd"
      DisplayName="My Super Duper Control Library"
      ProductFamilyName="MyControlLib"
      Description="My Control Library"
      MinVSVersion="12.0"
      Identity="MyControlLib, Version=1.0.0.0"
      MinToolsVersion="12.0"
      AppliesTo="WindowsAppContainer + ( Managed )"
      SupportedArchitectures="x86;x64;ARM"
      DependsOn="Microsoft.VCLibs, version=12.0"
      SupportsMultipleVersions="Error">
        <File Reference="NativeLib.winmd" Implementation="NativeLib.dll" />
        <File Reference="ManagedLib.dll"/>
    </FileList>

   
Note that if you don't have native dependencies, this would change quite a lot. The full set of properties are pretty poorly documented today, so generally I download and install a wealth of extension sdks and look at them and see if they do similar things to me and then copy from that.

Building an Extension SDK from an installed app

So now that we know the layout of an extension sdk, let us apply that to 'reverse-engineering' an already deployed app into an extension sdk and use that to build our own app on top. Because Windows Store apps aren't fully encrypted, this means you can often take parts of an app that's separated out into libraries and build a new app from these libraries. This is something to consider when you build your app - if you are really good are separating your stuff into sub-libraries, you also make it easier for others to reuse your stuff. As an example let's download the Bing Maps Preview app and reverse it into an SDK and build our own 3D Map App.

When you installed the app, you will be able to access a folder with a name similar to the following with administrator rights:
"c:\Program Files\WindowsApps\Microsoft.Maps3DPreview_2.1.2326.2333_x64__8wekyb3d8bbwe\"

In here we'll find a lot of logic for the app, but the main one we are interested in is the "Bing.Maps" folder and the Bing.Maps dll+winmd. The folder is essentially the content and is image resources and shaders. The Bing Maps.dll and Winmd are C++ WinRT components. Since the dll is C++, the architecture will either be ARM, x86 or x64 depending on what PC you downloaded it on. In my case it's x64 so I should be able to build an extension sdk that will support 64 bit PCs from this alone. If I want to support more, I will have to install the app on a x86 or ARM PC and copy the dll from there as well (the other files are neutral and will be the same).

So let's first create the following folder : "Bing.Maps\1.0.0.0\".

Next, let's copy the "Bing.Maps" folder that has all the images and shaders into
    \Bing.Maps\1.0.0.0\Redist\CommonConfiguration\neutral\Bing.Maps\
Next copy the Bing.Maps.dll into (x64 if that's what you have, change/add ARM/x86 if your binary isn't x64)
    \Bing.Maps\1.0.0.0\Redist\CommonConfiguration\x64\Bing.Maps.dll
Lastly, copy the Bing.Maps.winmd into:
    \Bing.Maps\1.0.0.0\References\CommonConfiguration\neutral\Bing.Maps.winmd

Lastly we need to create a new file in \Bing.Maps\1.0.0.0\SDKManifest.xml to describe the SDK:

    <?xml version="1.0" encoding="utf-8" ?>
    <FileList
      xmlns:xsi="
http://www.w3.org/2001/XMLSchema-instance"
      xsi:noNamespaceSchemaLocation="SDKManifest.xsd"
      DisplayName="Bing Maps"
      ProductFamilyName="Bing.Maps"
      MinVSVersion="12.0"
      Identity="Bing.Maps, Version=1.0.0.0"
      MinToolsVersion="12.0"
      AppliesTo="WindowsAppContainer"
      SupportedArchitectures="x86;x64;ARM"
      DependsOn="Microsoft.VCLibs, version=12.0"
      SupportsMultipleVersions="Error">
        <File Reference="Bing.Maps.winmd" Implementation="Bing.Maps.dll" />
    </FileList>

Voila! We now have an ExtensionSDK. There's several ways you can 'install' this into Visual Studio. The simplest way is to copy the folder into your user folder under %USERPROFILE%\AppData\Local\Microsoft SDKs\<target platform>\v<platform version number>\ExtensionSDKs.
In this case %USERPROFILE%\AppData\Local\Microsoft SDKs\Windows\v8.1\ExtensionSDKs\

If you're building an installer you can also install it into
    %Program Files%\Microsoft SDKs\Windows\v8.1\ExtensionSDKs
Or specify a link to the location of the folder in a registry key:
    HKLM\Software\Microsoft\Microsoft SDKs\Windows\v8.1\ExtensionSDKs\Bing.Maps\1.0.0.0\

Lastly you can do this in your project file    by using the 'SDKReferenceDirectoryRoot' tag. Add the following right before the <Target Name="BeforeBuild"/> tag at the very bottom.

  <PropertyGroup>
    <SDKReferenceDirectoryRoot>c:\myfolder\my_sdks\;$(SDKReferenceDirectoryRoot)</SDKReferenceDirectoryRoot>
  </PropertyGroup>

Note that for the latter, the folder should point to a root extension sdk folder, meaning the SDK above must be located in a certain tree under this folder. In this case:
    c:\myfolder\my_sdks\Windows\v8.1\ExtensionSDKs\Bing.Maps

When you've done any of these install options, you can now get started building an app. Go to "Add References" and the Bing Maps entry should show up.

image

Now add the following XAML to your page:

        <bing:Map x:Name="map" xmlns:bing="using:Bing.Maps">
            <bing:Map.MapProjection>
                <bing:ThreeDimensionalMapProjection />
            </bing:Map.MapProjection>
        </bing:Map>

And in code-behind after "InitializeComponents":

            map.BaseLayers = Bing.Maps.BaseLayers.CreatePhotoRealisticOverlay();

Run the app and you should see a 3D globe!

image

Note: This Bing Maps SDK is not based on anything officially released but on a un-finished app. This is by all means a giant hack and only meant as an exercise to build an Extension SDK. Use this at your own risk and don’t attempt to publish any apps using it.

References:

Adding a platform target dropdown to Visual Studio

Lately I’ve been writing or using a lot of native libraries in my Windows Phone and Windows 8 apps. If you are using sqlite, Bing maps, or any other 3rd party native dependency in your .NET app, you’ve probably hit the same issue if your Visual Studio is configured for C# or VB.NET layout: There’s no quick way to tell if you’re compiling for x86, ARM or x64 or to change it. You’ll need to go to the Configuration Manager menu, and change it there:

image

It’s really annoying when switching devices and I forget to pick the right platform, or think I’m working on a different target that I am. If you configured your Visual Studio for C++, you will have noticed this has a second dropdown next to the release/debug dropdown where you can quickly glance what platform you’re targeting and can change it instantly.

image

Fortunately you can add this dropdown to your Visual Studio even if it was configured for .NET. Below is a video of the steps needed to add it to your toolbar: